29.03.2018
PREPARATION OF ILLUSTRATIONS OF MOST COMPLEX MORPHOLOGICAL CHARACTERS (STRUCTURES) OF ENTOMOLOGICAL OBJECTS AT THE CONTEMPORARY LEVEL
The most important condition for the examination of taxonomic peculiarities of any group is a careful illustration of their characters, the bases of preparation of which were published earlier (Tereshkin, 2013a,b). Since that period (2013) we have tried to maximally improve the image technology of the signs of problem groups up to their full compliance with the scientific description. As a visual example, the most complex in the taxonomy genus Anisobas is given, using the example of A. platystylus (Thomson). In this example, the most perfect system for preparing tables of illustrations of a taxon was developed. In this case, we give, as examples, detailed descriptions of the procedures for preparing the sculpture of surface and arrangement of fragments of a body for the standard and maximally compact image of the object at the imaginal stage.
Detalisation of the structures of surface on an example of propodeum.
As noted in previous publications (Tereshkin, 2013a,b), one of the most laborious processes in the image of entomological objects (or other objects of wildlife) is the elaboration in details of the surface structure. It can be the different wrinkles, puncturation of different types, microsculpture, etc. Moreover, the initial condition is the classification of these formations by the researcher. When preparing some fragments of the object's body, the number of layers required can reach 200. This allows you to correct each layer separately, achieving the maximum effect.
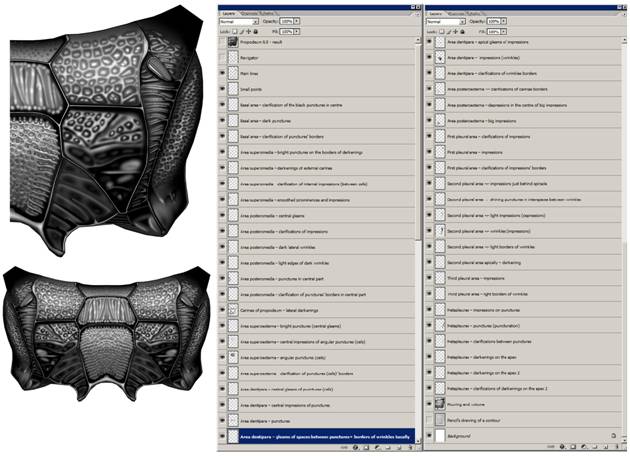
On an example of species Anisobas platystylus with the most complex structure of the surface, it was decided to fulfill the image as much as possible, i.e. with a maximum number of layers and the details of structures. It is especially difficult to depict a sculpture of a surface. First it should be classified in the mind according to the types of points, wrinkles, cells, etc. and only after that, to depict each element of the sculpture separately. In this example the details elaboration of sculpture was fulfilled separately for each field of propodeum. That is, one field can be with angular punctures, the other with round ones, the third has a mixed character, and so on. All the layers with each separate element are visible on the attached figure (Figures 1-5). And besides, all layers should be located from the bottom up, which is shown in the figure and in the order of the numbering of layers. By means of roman numerals are numbered the individual fragments of the segment (more frequent fields), and numbers in parentheses are the numbers of the layers.
XVII: (51) – Propodeum 0,5 – (Result). XVI: (50) –Navigator. XV: (49) – Main lines. XIV: (48) – Small points. XIII: (47) – Basal area – сlarification of the black punctures in centre; (46) – Basal area – dark punctures; (45) – Basal area – сlarification of punctures’ borders. XII: (44) – Area superomedia – bright punctures on the borders of darkenings; (43) – Area superomedia – darkenings of external carinae; (42) – Area superomedia – [(сlarification of internal impressions (between wrinkles)]; (41) – Area superomedia – smoothed prominences and impressions. XI: (40) – Area posteromedia – central gleams; (39) – Area posteromedia – сlarifications of impressions; (38) – Area posteromedia – dark lateral wrinkles; (37) – Area posteromedia – light edges of dark wrinkles; (36) – Area posteromedia – punctures in central part; (35) – Area posteromedia –larification of punctures’ borders in central part. X: (34) – Carinae of propodeum – lateral darkenings. IX: (33) – Area superoexterna – bright punctures (central gleams); (32) – Area superoexterna – central impressions of angular punctures (cells); (31) – Area superoexterna – angular punctures (cells); (30) – Area superoexterna – сlarification of punctures (cells) borders. VIII: (29) – Area dentipara – central gleams of punctures (cells); (28) – Area dentipara – central impressions of punctures; (27) – Area dentipara – punctures; (26) – Area dentipara – gleams of spaces between punctures+borders of wrinkles basally; (25) – Area dentipara – apical gleams of impressions; (24) – Area dentipara – impressions (wrinkles); (23) – Area dentipara – сlarifications of wrinkles borders. VII: (22) – Area posteroexterna – сlarifications of carinae borders; (21) – Area posteroexterna – depressions in the centre of big impressions; (20) – Area posteroexterna – big impressions. VI: (19) – First pleural area – сlarifications of impressions; (18) – First pleural area – impressions; (17) – First pleural area – сlarifications of impressions’ borders. V: (16) – Second pleural area – impressions just behind spiracle; (15) – Second pleural area – shining punctures in interspaces between wrinkles; (14) – Second pleural area – (light impressions (depressions); (13) – Second pleural area – wrinkles (impressions); (12) – Second pleural area – light borders of wrinkles; (11) – Second pleural area apically – darkenings. IV: (10) – Third pleural area – impressions; (9) – Third pleural area – light borders of wrinkles. III: (8) – Metapleurae – impressions on punctures; (7) – Metapleurae punctures (puncturation); (6) – Metapleurae – clarifications between punctures; (5) – Metapleurae – darkenings on the apex; (4) – Metapleurae – darkenings on the apex 2; (3) – Metapleurae – clarifications of darkenings on the apex 2. II: (2) – Pouring and volume. I: (1) – Pencil’s drawing of a contour.
 |
|
1-2 |
3-4 |
Figures 1-4. Elaboration of the surface sculpture of propodeum of female of Anisobas platystylus (Thoms.): 1-2 – propodeum, 3-4 – layers which are necessary for the fulfillment of the characters of the segment and their hierarchy.
(Проработка скульптуры поверхности проподеума самки Anisobas platystylus (Thoms.): 1-2 – проподеум, 3-4 – слои необходимые при выполнении признаков сегмента и их иерархия.)
After correction each layer, they are combined, obtaining a ready image (Figure 1). In doing so, the layers "Navigator", "Pencil’s drawing of a contour" and "Background" should are disabled. After merging the visible layers, the resulting layer is selected with the command Ctrl–A, and copied to the buffer. In the next stage, all the previously merged layers are restored (Ctrl–Alt–Z) and selecting the upper layer, paste the final image (Ctrl–V) from the buffer.
The main condition is the fulfillment of each structure in a large format. With a decrease to a normal size, many details are no longer visible, but the image itself becomes "natural."
__________________
* – You can view the layers separately in a Photoshop program by reference
http://tereshkin.info/Propodeum-05-Anisobas platystylus-fem-english.tif
“Composing” of imago from different parts of a body.
One of the most important components of the table of scientific illustrations of a taxon is the layout of the standard and maximally compact image of the object at the imaginal stage. As a rule, when preparing a picture of an imago object, separate parts of the body are depicted separately and in the same scale, which in the following allows avoiding distortion of the body proportions. The most optimal for imago compositing, is 26 layers, represented by separate fragments of the body (Figures 5-7). The key factor in the preparation of an object is the hierarchy of layers. The position of each of the fragments can be changed by the option (Transform–Rotate). Arrangement of layers are fulfilled by such a way that to avoid superposition on the layers which situated over them For example, the layer "Scapus" should always be located below the "Head capsule" layer. That is, the head capsule closes the parts of the scapus located in the antennal cavities and, thus, is not visible from the side.
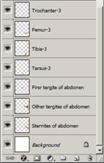
For the object studied, the layers were arranged from the top down as follows: (26) – Last variant (Result), (25) – Head capsule, (24) – Scapus, (23) – Maxillary palp, (22) – Labial palp, (21) – Tegula, (20) – Flagellum, (19) – Wing-2, (18) – Wing-1, (17) – Thorax, (16) – Coxa-1, (15) – Femur-1, (14) – Tibia-1, (13) – Tarsus-1, (12) – Coxa-2, (11) – Femur-2, (10) – Tibia-2, (9) – Tarsus-2, (8) – Coxa-3, (7) – Trochanter-3, 6 – Femur-3, 5 – Tibia-3, (4) – Tarsus-3, (3) – First segment of abdomen, (2) – The rest tergites of abdomen, (1) – Sternites of abdomen.
The numbering of layers shows the necessary order of their insertion into the image and increases from bottom to top until the final result is obtained. All layers should be located from the bottom up, which is shown in the figure and in the order of the numbering of the layers (see figures 5-7).
 |
|
|
5 |
6 |
7 |
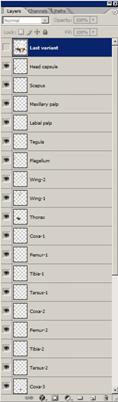
Figures 5-7. “Composing” of imago female of Anisobas platystylus (Thoms.) from different parts of a body: 5 – imago of female; 6-7 – hierarchy of layers.
(Компоновка имаго самки Anisobasplatystylus(Thoms.) из отдельных частей тела: 5 – имаго самки; 6-7 – иерархия слоев.)
After merging all the layers except for "Background", copying image to the buffer, canceling commands of merging (Ctrl–A), the finished image is inserted from the buffer above the selected top layer.
русский текст
Подготовка иллюстраций наиболее сложных признаков (структур) на современном уровне.
Важнейшим условием разработки таксономических особенностей любой группы, является тщательная иллюстрация их признаков, основы подготовки которых были опубликованы ранее (Терёшкин, 2013; Tereshkin, 2013). С того периода (2013) мы попытались максимально усовершенствовать технологию изображения признаков проблемных групп до полного их соответствия научному описанию. В качестве наглядного примера приводятся наиболее сложный в таксономическом плане род Anisobas на примере вида A. platystylus (Thomson). На этом примере была разработана максимально совершенная система подготовки таблиц иллюстраций таксона. В данном случае мы приводим в качестве примеров подробные описания процедур подготовки скульптуры поверхности и компоновки стандартного и максимально компактного изображения объекта на имагинальной стадии.
Проработка структур поверхности на примере промежуточного сегмента.
Как было отмечено в предыдущих публикациях (Терёшкин, 2013; Tereshkin, 2013), одним из наиболее трудоемких процессов при изображении энтомологических объектов (или других объектов живой природы), является проработка структуры поверхности. Это могут быть различного типа морщины, пунктировка разного типа, микроскульптура и т.п. Причем, первоначальным условием является классификация этих образований исследователем. При подготовке некоторых фрагмента тела объекта количество необходимых слоем может достигать 200. Это позволяет корректировать каждый слой отдельно, достигая максимального эффекта.
На примере вида Anisobas platystylus с максимально сложной структурой поверхности, было решено выполнить изображение по максимуму, т.е. с максимальным числом слоев при максимальной детализации структур. Особенно сложно изображать скульптуру поверхности. Сначала ее надо в уме классифицировать по типам точек, морщин, ячеек и т.п. и только после этого, изображать каждый элемент скульптуры отдельно. Сейчас проработка скульптуры выполнялась отдельно по каждому полю. То есть, одно поле может быть с угловатыми точками, другое с круглыми, третье носить смешанный характер и т.п. Все слои с каждыми отдельными элементами видны на прикрепленном рисунке (см. выше). Причем, все слои должны быть расположены снизу вверх, что приведено на рисунке и в порядке нумерации слоев. Римскими цифрами пронумерованы отдельные фрагменты сегмента (чаще поля), а номерами в скобках – номера слоев.
XVII: (51) – Propodeum 0,5 – Результат (Result). XVI: (50) – Навигатор (Navigator). XV: (49) – Основные линии (Main lines). XIV: (48) – Мелкие точки (Small points). XIII: (47) – Basal area – просветление черных точек в центре (сlarification of the black punctures in centre); (46) – Basal area – темные точки (dark punctures); (45) – Basal area – просветление краев точек (сlarification of punctures’ borders). XII: (44) – Area superomedia – блестящие точки на краях затемнений (bright punctures on the borders of darkenings); (43) – Area superomedia – затемнения внешних килей (darkenings of external carinae); (42) – Area superomedia – просветление внутренних вдавлений (между морщинами) [(сlarification of internal impressions (between wrinkles)]; (41) – Area superomedia – сглаженные выступы и вдавления (smoothed prominences and impressions). XI: (40) – Area posteromedia – центральные проблески (central gleams); (39) – Area posteromedia – просветления вдавлений (сlarifications of impressions); (38) – Area posteromedia – темные латеральные морщины (dark lateral wrinkles); (37) – Area posteromedia – светлые края темных морщин (light edges of dark wrinkles); (36) – Area posteromedia – точки в центральной части (punctures in central part); (35) – Area posteromedia – просветление краев точек в центральной части (сlarification of punctures’ borders in central part). X: (34) – Кили проподеума – латеральные затемнения (Carinae of propodeum – lateral darkenings). IX: (33) – Area superoexterna – яркие точки (центральные проблески) [bright punctures (central gleams)]; (32) – Area superoexterna – центральные вдавления угловидных точек (ячеек) [central impressions of angular punctures (cells)]; (31) – Area superoexterna – угловидные точки (ячейки) [angular punctures (cells)]; (30) – Area superoexterna – просветление краев точек (ячеек) [сlarification of punctures (cells) borders]. VIII: (29) – Area dentipara – центральные проблески точек (ячеек) [central gleams of punctures (cells)]; (28) – Area dentipara – центральные вдавления точек (central impressions of punctures); (27) – Area dentipara – точки (punctures); (26) – Area dentipara – проблески между точками+на краях морщин базально (gleams of spaces between punctures+borders of wrinkles basally); (25) – Area dentipara – апикальные проблески вдавлений (apical gleams of impressions); (24) – Area dentipara – вдавления (морщины) [impressions (wrinkles)]; (23) – Area dentipara – просветления краев морщин (сlarifications of wrinkles borders). VII: (22) – Area posteroexterna – просветления краев килей (сlarifications of carinae borders); (21) – Area posteroexterna – углубления в центре крупных вдавлений (depressions in the centre of big impressions); (20) – Area posteroexterna – крупные вдавления (big impressions). VI: (19) – First pleural area – просветления вдавлений (сlarifications of impressions); (18) – First pleural area – вдавления (impressions); (17) – First pleural area – просветления краев вдавлений (сlarifications of impressions’ borders). V: (16) – Second pleural area – вдавления сразу за дхальцами (impressions just behind spiracle); (15) – Second pleural area – блестящие точки в промежутках между морщинами (shining punctures in interspaces between wrinkles); (14) – Second pleural area – светлые вдавления (углубления) [(light impressions (depressions)]; (13) – Second pleural area – морщины (вдавления) [wrinkles (impressions)]; (12) – Second pleural area – светлые края морщин (light borders of wrinkles); (11) – Second pleural area apically – затемнение (darkening). IV: (10) – Third pleural area – вдавления (impressions); (9) – Third pleural area – светлые края морщин (light borders of wrinkles). III: (8) – Metapleurae – вдавления на точках (impressions on punctures); (7) – Metapleurae – точки (пунктировка) [punctures (puncturation)]; (6) – Metapleurae – просветления между точками (clarifications between punctures); (5) – Metapleurae – затемнения на вершине (darkenings on the apex); (4) – Metapleurae – затемнения на вершине (darkenings on the apex 2); (3) – Metapleurae – просветления затемнений на вершине 2 (clarifications of darkenings on the apex 2). II: (2) – Заливка и объем (Pouring and volume). I: (1) – Карандашный рисунок контура (Pencil’s drawing of a contour).
После корректировки каждого слоя, их объединяют, получая готовое изображение (Fig. 1). При этом слои “Навигатор” (Navigator), “Карандашный рисунок контура” (Pencil’s drawing of a contour) и “Background” – отключают. После объединения видимых слоев, полученный слой выделяют командой Ctrl–A и копируют в буфер. На следующем этапе, восстанавливают все объединенные ранее слои (Ctrl–Alt–Z) и выделив самый верхний слой, вставляют из буфера итоговое изображение (Ctrl–V).
Главным условием является изображение каждой структуры в большом формате. При уменьшении до нормального размера, многие детали уже не видны, но само изображение становится «естественным».
_________________________
http://tereshkin.info/Propodeum-05-Anisobas platystilus-fem-russian.tif
Компоновка рисунка имаго из отдельных частей тела.
Одной из важнейших составляющих таблицы научных иллюстраций таксона является компоновка стандартного и максимально компактного изображения объекта на имагинальной стадии. Как правило, при подготовке рисунка имаго объекта отдельные части тела изображаются отдельно и в одном масштабе, что позволяет в последующем избежать искажения пропорций тела. Наиболее оптимальным, при компоновке имаго, является 26 слоев, представленных отдельными фрагментами тела (Fig. 5-7). Ключевым фактором при подготовке имаго объекта является иерархия слоев. Положение каждого из фрагментов можно менять опцией (Transform–Rotate). Расположение слоев выполняется таким образом, что бы не было налегания на вышележащие. Например, слой «скапус» всегда должен располагаться ниже слоя «головная капсула», то есть головная капсула закрывает части скапуса, расположенные в усиковых впадинах и, таким образом, не заметны латерально.
Для изучаемого объекта слои располагались сверху вниз следующим образом: (26) – Итоговое изображение имаго [Last variant (Result)], (25) – Головная капсула (Head capsule), (24) – Скапус (Scapus), (23) – Максиллярный щупик (Maxillary palp), (22) – Лабиальный щупик (Labial palp), (21) – Тегула (Tegula), (20) – Жгутик (Flagellum), (19) – Крыло-2 (Wing-2), (18) – Крыло-1 (Wing-1), (17) – Грудь (Thorax), (16) – Тазик-1 (Coxa-1), (15) – Бедро-1 (Femur-1), (14) – Голень-1 (Tibia-1), (13) – Лапка-1 (Tarsus-1), (12) – Тазик-2 (Coxa-2), (11) – Бедро-2 (Femur-2), (10) – Голень-2 (Tibia-2), (9) – Лапка-2 (Tarsus-2), (8) – Тазик-3 (Coxa-3), (7) – Вертлуг-3 (Trochanter-3), 6 – Бедро-3 (Femur-3), 5 – Голень-3 (Tibia-3), (4) – Лапка-3 (Tarsus-3), (3) – Первый сегмент брюшка (First segment of abdomen), (2) – Остальные тергиты брюшка (The rest tergites of abdomen), (1) – Стерниты брюшка (Sternites of abdomen). Нумерация слоев показывает необходимый порядок их вставки в изображение и возрастает снизу вверх до получения конечного результата. Все слои должны быть расположены снизу вверх, что приведено на рисунке и в порядке нумерации слоев (см. figures.5-7).
После объединения всех слоев кроме “Background”, копирование изображения в буфер, отмену команды объединения (Ctrl–A), готовое изображение вставляют из буфера над выделенным верхним слоем.
20.12.2013
The work "Guide to preparing scientific illustrations in Entomology on an example of Ichneumonidae (Hymenoptera)" is published in Linzer biol. Beitr., 45/2: 1047-1277.
Work is devoted
to a technique of preparation of unified illustrations of zoological objects.
In this work the methods of fulfillment of illustrations from completely manual
up to performing the entire procedure in a graphics editor (Photoshop) are
considered. The proposed technique enables fulfillment of scientific illustrations
by specialists in concrete groups of organisms not necessarily possessing art
skills. In the work main principles and approaches to fulfillment of scientific
images of objects are stated. On an example of ichneumon flies of fam.
Ichneumonidae, fulfillment of all actions necessary for creating illustrations,
both of total object, and features of morphology of taxonomically significant
parts of a body, is described in details and step by step. The possibilities of
usage of intermediate layers of files with drawings as illustrations of
characters for taxonomical analysis, and for revealing regularities of development
of same or other characters and as illustrations in identification keys are considered.
On an example of a single species – Pithotomus
tschitscherini (Kokujev,1904) – the sequence of actions from fulfillment of
a contour of objects up to preparation of the final table of illustrations of a
taxon in a color format is demonstrated. In conclusion, a detailed, unified description
of the object with a numbering of all characters which are labeled in the
summary plate of illustrations is adduced. All necessary operations are
illustrated with 864 drawings and the results with 47 color tables containing
285 finished color pictures of total images of imago and taxonomically
significant body parts. Principles, techniques and the sequence of operations
developed for model group of insects can be used for preparation of the unified
scientific illustrations of any objects of wildlife.
The guide is
intended for scientists and graduate students specializing in taxonomy of any
wildlife objects. It can be used in the practical training of students studying
for biological specialties. The article may be useful to animal painters and
designers who use computer graphics in their work.

07.2013
Монография «Руководство по подготовке научных иллюстраций в энтомологии на примере наездников семейства Ichneumonidae (Hymenoptera)» вышла из печати на русском языке.
В книге представлена техника
подготовки унифицированных иллюстраций зоологических объектов, рассмотрены методы выполнения иллюстраций от
полностью «вручную» до полной их подготовки в графическом редакторе (Photoshop). Предложенная техника позволяет выполнять
научные иллюстрации специалистам по конкретным группам организмов и не
обладающим художественными навыками. В работе изложены основные принципы и
подходы к подготовке научных изображений объектов. На примере наездников сем. Ichneumonidae детально и пошагово описаны все необходимые
действия по выполнению иллюстраций как объекта в целом, так и таксономически
значимых частей тела. Рассмотрены возможности использования промежуточных слоев
файлов с рисунками в качестве иллюстраций признаков при таксономическом
анализе, для выявления закономерностей развития тех или иных признаков и в
качестве иллюстраций в определительных ключах. На примере одного вида – Pithotomus tschitscherini (Kokujev,1904)
– прослежена последовательность действий от изображения контура объекта до
подготовки итоговой таблицы иллюстраций таксона в цветном формате. В заключение
приводится подробное унифицированное описание объекта с нумерацией всех
признаков, отображенных в итоговой таблице иллюстраций. Включено 1315 отдельных
рисунка, иллюстрирующих все выполняемые операции и их результаты. Принципы,
техника и последовательность операций, разработанная для модельной группы объектов,
могут быть использованы для подготовки унифицированных научных иллюстраций
любых объектов живой природы.
Монография предназначена для научных работников и аспирантов, специализирующихся в области систематики объектов живой природы. Она может быть использована при проведении практических занятий студентов биологических специальностей вузов. Руководство полезно художникам-анималистам, дизайнерам, использующим в своей работе компьютерную графику, а также всем любителям живой природы.

11.2012
Manuscript is ready to print now.
Tereshkin A. M. Guidance on the preparation of scientific illustrations in Entomology on an example of Ichneumonidae.
Abstract
Work is devoted to technique of preparation of the unified illustrations of zoological objects. In this work the methods of fulfillment of illustrations from completely “manually”, up to their completely fulfillment in the graphical editor (Photoshop) are considered. The proposed technique allows fulfilling scientific illustrations by specialists by concrete groups of organisms and not possessing art skills. In the work main principles and approaches to fulfillment of scientific images of objects are stated. On an example of ichneumon flies of fam. Ichneumonidae, fulfillment of all necessary actions on performance of illustrations, both total object, and features of morphology taxonomically significant parts of a body too, is described in details and step by step. The sequence of actions from fulfillment of a contour of objects up to preparation of the final table of illustrations of taxon in a color format is demonstrated. The possibilities of usage of intermediate layers of files with drawings as illustrations of characters for taxonomical analysis, and for revealing of regularities of development of those or other characters and as illustrations in identification keys are considered. All necessary operations are illustrated by 864 drawings and the results by 47 color tables containing 285 finished color pictures of total images of imago and taxonomically significant parts of a body.
Principles, techniques and the sequence of operations which developed for model group of insects can be used for preparation of the unified scientific illustrations of any objects of wildlife.
Рукопись подготовлена к печати.
Терёшкин А. М. Руководство по подготовке научных иллюстраций в энтомологии на примере наездников семейства Ichneumonidae.
Реферат
Работа посвящена технике подготовки унифицированных иллюстраций зоологических объектов. В работе рассматриваются методы выполнения иллюстраций от полностью «вручную» до полного их выполнения в графическом редакторе (Photoshop). Предложенная техника позволяет выполнять научные иллюстрации специалистам по конкретным группам организмов и не обладающим художественными навыками. В работе изложены основные принципы и подходы к выполнению научных изображений объектов. На примере наездников сем. Ichneumonidae детально и пошагово описано выполнение всех необходимых действий по выполнению иллюстраций как тотального объекта, так и особенностей морфологии таксономически значимых частей тела. Прослежена последовательность действий от выполнения контура объектов до подготовки итоговой таблицы иллюстраций таксона в цветном формате. Рассмотрены возможности использования промежуточных слоев файлов с рисунками в качестве иллюстраций признаков при таксономическом анализе, для выявления закономерностей развития тех или иных признаков и в качестве иллюстраций в определительных ключах. Все выполняемые операции проиллюстрированы 864 рисунками, а результаты 47 цветными таблицами, содержащими 285 готовых цветных рисунка тотальных изображений имаго и таксономически значимых частей тела.
Принципы, техника и последовательность операций, разработанная для модельной группы объектов, могут быть использованы для подготовки унифицированных научных иллюстраций любых объектов живой природы.

06.2011
At the present time, a new full version of the "Guidelines for the scientific illustrations preparation in entomology, on the basis of using of digital image processing (on an example of ichneumon flies of the family Ichneumonidae)» is in the final stage of preparation. The work includes the most detailed and step-by-step descriptions of all the operations that is necessary to prepare the graphic images of objects and their characters in the Photoshop graphic editor. It will be illustrated with hundreds of illustrations reflecting the sequence of stages of preparation of images, both black and white and in color format. The Guide will allow taxonomists who have no drawing capabilities, to prepare uniform, high-quality illustrations as total zoological object, and details of their morphology of great taxonomic importance too. Technique of images preparation described in the manual can be used to prepare the graphical representation of any object of wildlife. The manual will be prepared in Russian and English languages.
В настоящее время новая полная версия «Руководства по подготовке научных иллюстраций в энтомологии на основе использования цифровой обработки изображений (на примере наездников семейства Ichneumonidae)», находится в завершающей стадии подготовки. Работа включает максимально подробное и последовательное описание всех операций, необходимых для подготовки графических изображений объектов и их признаков в редакторе Photoshop. Она будет проиллюстрирована сотнями иллюстраций отражающих последовательность всех стадий подготовки изображений, как в черно-белом, так и в цветном формате. Руководство позволит специалистам-систематикам, не имеющим художественных навыков, подготовить унифицированные, качественные иллюстрации как тотальных зоологических объектов, так и деталей их морфологии имеющих важное таксономическое значение. Техника подготовки изображений, изложенная в руководстве может быть использована для подготовки графического представления любых объектов живой природы. Руководство будет подготовлено на русском и английском языках.